Info kplace.plala.jpから移設しました
CentOS7 /MySQL 5.7
作成日: 2017/06/18■目的
CentOS 7にMySQL 5.7をインストールします。
 MySQL
のサイトはこちら
MySQL
のサイトはこちら ■インストール
CentOS 7標準 mariaDBを削除します。
続いてMySQLリポジトリを追加したらMySQL 5.7をインストールします。
# yum remove mariadb-libs
# yum localinstall http://dev.mysql.com/get/mysql57-community-release-el7-7.noarch.rpm
# yum -y install mysql-community-server
■構成ファイル# yum localinstall http://dev.mysql.com/get/mysql57-community-release-el7-7.noarch.rpm
# yum -y install mysql-community-server
/etc/my.cnfを編集し2行を追加します。
# vi /etc/my.cnf
[mysqld]
:
character-set-server = utf8
default_password_lifetime = 0
■起動/自動起動[mysqld]
:
character-set-server = utf8
default_password_lifetime = 0
MySQLの起動と自動起動設定を行います
# systemctl enable mysqld.service <- 自動起動設定
# systemctl start mysqld.service <- 起動
■Security設定# systemctl start mysqld.service <- 起動
MySQLのroot仮パスワードを表示させます。
続いて仮パスワードの変更とSecurityの設定を実行します。
# cat /var/log/mysqld.log | grep 'temporary
password' <- 仮パスワードを表示
2017-06-18T06:39:33.346652Z 1 [Note] A temporary password is generated for root@localhost: &F<xEFl#y9lI
# mysql_secure_installation
・仮パスワードの変更
Securing the MySQL server deployment.
Enter password for user root: <- 仮パスワード
The existing password for the user account root has expired. Please set a new password.
New password: <- 新しいrootパスワードを入力
Re-enter new password: <-再入力
:
Estimated strength of the password: 100
Change the password for root ? ((Press y|Y for Yes, any other key for No) : y
・新しいパスワードでsecurity設定
New password: <- 新しいrootパスワード
Re-enter new password: <- 新しいrootパスワード
:
Estimated strength of the password: 100
Do you wish to continue with the password provided?(Press y|Y for Yes, any other key for No) : y
・匿名アカウントの削除
Remove anonymous users? (Press y|Y for Yes, any other key for No) : y
Success.
・リモートログインの無効化
Disallow root login remotely? (Press y|Y for Yes, any other key for No) : y
Success.
・テストDBの削除
Remove test database and access to it? (Press y|Y for Yes, any other key for No) : y
- Dropping test database...
Success.
- Removing privileges on test database...
Success.
・変更事項の適用
Reload privilege tables now? (Press y|Y for Yes, any other key for No) : y
Success.
All done!
■DBの作成2017-06-18T06:39:33.346652Z 1 [Note] A temporary password is generated for root@localhost: &F<xEFl#y9lI
# mysql_secure_installation
・仮パスワードの変更
Securing the MySQL server deployment.
Enter password for user root: <- 仮パスワード
The existing password for the user account root has expired. Please set a new password.
New password: <- 新しいrootパスワードを入力
Re-enter new password: <-再入力
:
Estimated strength of the password: 100
Change the password for root ? ((Press y|Y for Yes, any other key for No) : y
・新しいパスワードでsecurity設定
New password: <- 新しいrootパスワード
Re-enter new password: <- 新しいrootパスワード
:
Estimated strength of the password: 100
Do you wish to continue with the password provided?(Press y|Y for Yes, any other key for No) : y
・匿名アカウントの削除
Remove anonymous users? (Press y|Y for Yes, any other key for No) : y
Success.
・リモートログインの無効化
Disallow root login remotely? (Press y|Y for Yes, any other key for No) : y
Success.
・テストDBの削除
Remove test database and access to it? (Press y|Y for Yes, any other key for No) : y
- Dropping test database...
Success.
- Removing privileges on test database...
Success.
・変更事項の適用
Reload privilege tables now? (Press y|Y for Yes, any other key for No) : y
Success.
All done!
databaseとそのユーザ/パスワードを設定します。
# mysql -u root -p
Enter password: <- rootパスワード入力
・デフォルトのdatabaseを表示
mysql> show databases;
+--------------------+
| Database |
+--------------------+
| information_schema |
| mysql |
| performance_schema |
| sys |
+--------------------+
4 rows in set (0.00 sec)
・database作成
mysql> create database 作成するDB名 character set utf8;
Query OK, 1 row affected (0.00 sec)
mysql> grant all on blog.* to DBユーザ名@localhost identified by 'DBパスワード';
Query OK, 0 rows affected, 1 warning (0.00 sec)
mysql> show databases;
+--------------------+
| Database |
+--------------------+
| information_schema |
| 作成したDB名 |
| mysql |
| performance_schema |
| sys |
+--------------------+
5 rows in set (0.00 sec)
mysql> exit
Bye
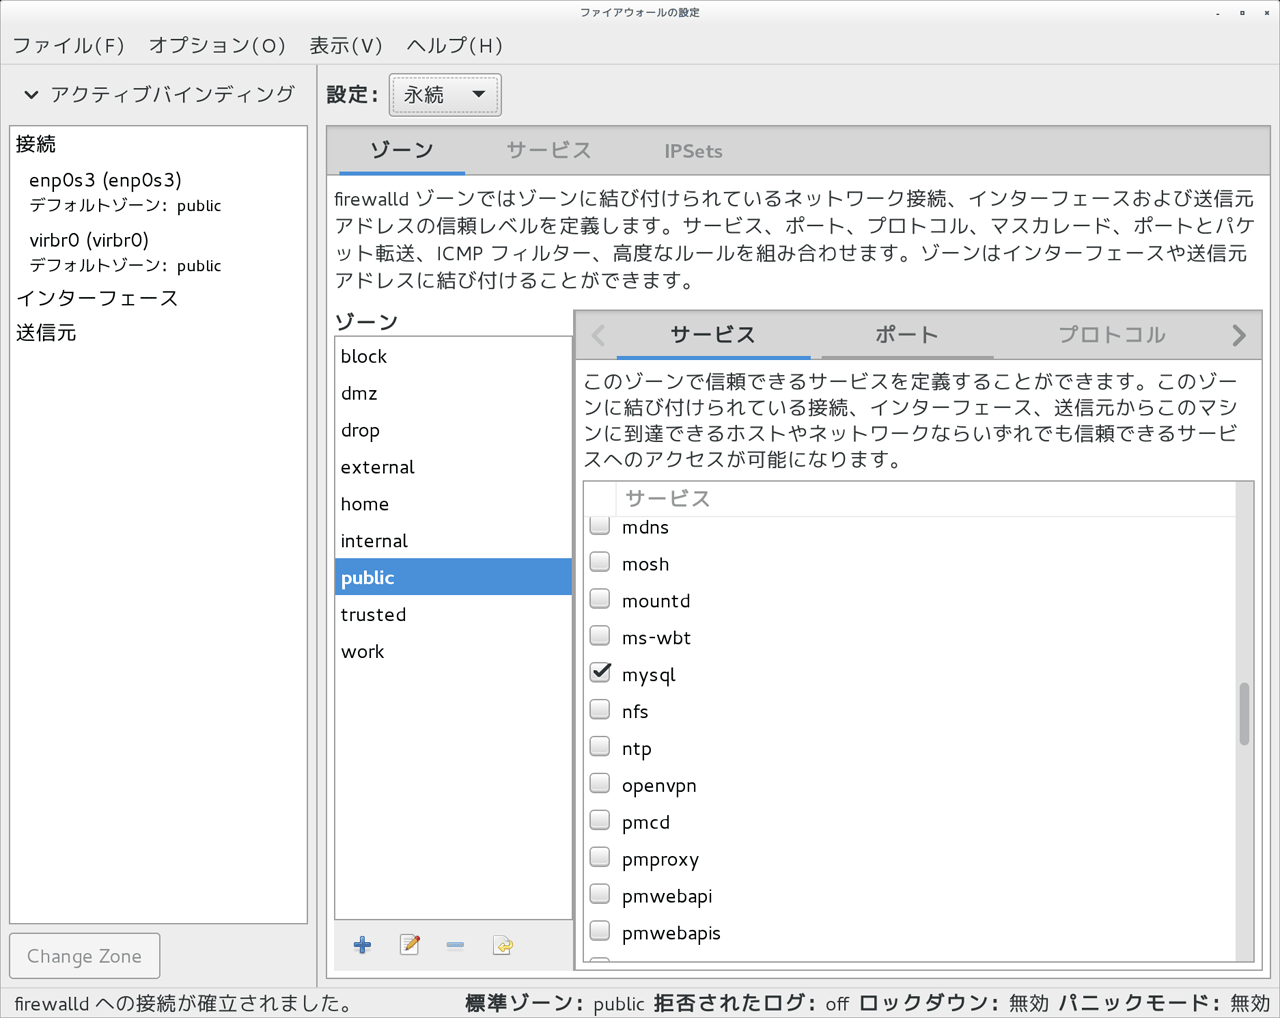
■Firewallの設定Enter password: <- rootパスワード入力
・デフォルトのdatabaseを表示
mysql> show databases;
+--------------------+
| Database |
+--------------------+
| information_schema |
| mysql |
| performance_schema |
| sys |
+--------------------+
4 rows in set (0.00 sec)
・database作成
mysql> create database 作成するDB名 character set utf8;
Query OK, 1 row affected (0.00 sec)
mysql> grant all on blog.* to DBユーザ名@localhost identified by 'DBパスワード';
Query OK, 0 rows affected, 1 warning (0.00 sec)
mysql> show databases;
+--------------------+
| Database |
+--------------------+
| information_schema |
| 作成したDB名 |
| mysql |
| performance_schema |
| sys |
+--------------------+
5 rows in set (0.00 sec)
mysql> exit
Bye
mysqlサービスを許可します。
■参考情報
Qiita
「CentOS7.1にMySQL 5.7をインストール」はこちら WEB
ARCH LABO「MySQL 5.7 を CentOS 7 に yum インストールする手順」はこちら ■結果
特に問題もなくインストールして動作を確認しました。